|
Step
16. STICKING
THE FOOT TOGETHER
The
difference between this exercise and the previous, where we had to merge
the
toes together, is that the toes, due to the fact they were copies of each
other,
contained the same number of points to be joined. In this case there are
less points at
the base of the foot then there are running around the gap at the top
of the toes.
This, I have to say, highlights the importance of trying to think ahead,
and leaving as
much of the detailing as possible until the end of the modeling.
Fortunately,
we now have the Bandsaw, a God send. This tool, which is found under
the Construct Tab, I have chosen to give a quick key of F5, as I find
it comes into
action regularly.
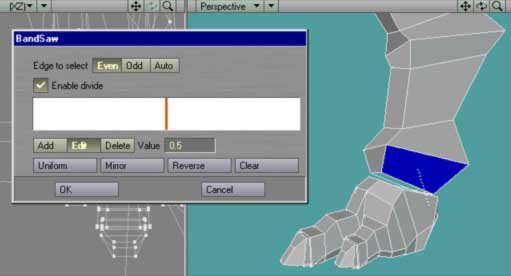
Fig.
16. The Bandsaw about to be applied to the foot.
Select
a side polygon, as indicated, on the bottom of the foot/leg and click
on
Bandsaw. Click Even, Enable Divide, accept the default in the middle and
Ok.
What
should of happened is the saw has cut a line all the way up the leg, following
the
polygons in a contour over the back. If it hasn't and is running around
the bottom,
you will need to undo and retry, but this time with Odd selected. It's
always one or
the other.

Fig.
17. Before and After Bandsaw
Now
do the same on the inside of the foot/leg, if you count you will see that
there are
now only 2 more points needed at the back of the foot. This time we will
use a
different method to get those extra points.
Step
16. STICKING
THE FOOT TOGETHER ( SMOOTH SHIFT)
To
add the extra two points we are going to use Smooth Shift, which is found
under
the Multiply Tab (or Press F). Smooth shift is similar to bevel accept
it can be used to
bevel a number of polys in one go. The best way to understand this is
to do it.
Select
the Polygons indicated, at the back of the foot, and Press F, followed
by the n
key to bring up the numeric requester. Activate and type a small measurement
like
-1 mm into the offset, leaving the other setting as default and Ok. We
want a very
small Smooth Shift, anything larger and Smooth Shift tends to get confused,
Don't
ask me Why? We will use the Stretch tool to scale our new polys into place.
Make
sure they are still selected.
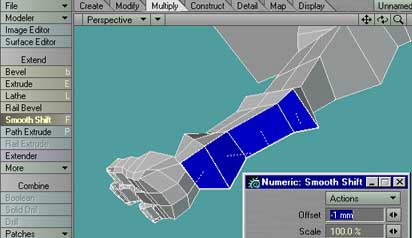
Fig.
18. The polys are selected and duplicated with the Smooth Shift command.
Step
17. Scale
the selected polys in, using the Stretch tool, under the Modify Tab, or
press h. This is best done from the Back and Side views, and should something
like
Fig 19.
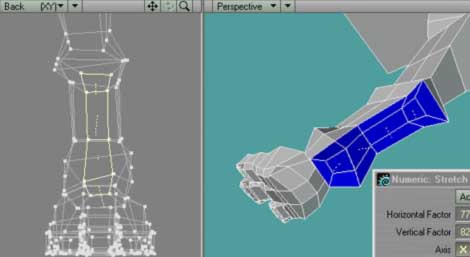
Fig.
19. The new polys are then Stretched into scale.
Step
18. Select
the indicated poly in Fig. 20 and delete. Then align the indicated points
with the corresponding points on the Toes ie. Down a bit. Now with the
methods
discussed previously, use the Drag tool to align the points where the
gaps are, and
select Merge points (Press m) and it's Absolute Distance setting. Remember
you will
need to have the objects on the same layer to Merge. It might be that
you feel more
comfortable merging 2 points at a time, in which case you can put a wild
setting of 1
km, it doesn't matter, into the Absolute Distance setting and merge points
by points.
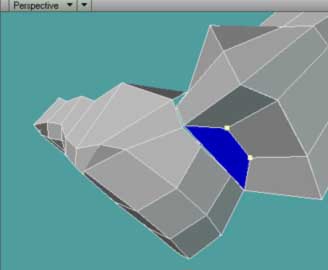
Fig.
20. Delete the Poly and Align the two points
Step
19. Point
Tweaking time. Referring to the reference, drag the points into place,
shaping from the heel down to the ball infront of the toes, Fig 21. should
give you
some idea. Hitting the TAB gives us a good idea of how things are looking.
Now back
to the leg!
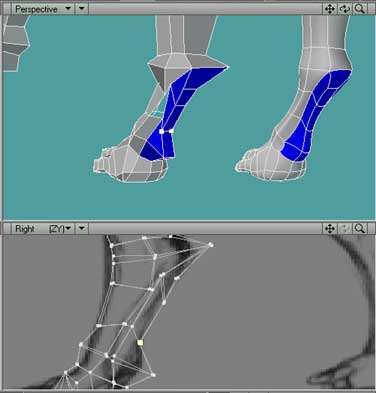
Fig.
21. Dragging the points about we can form the heel of the foot.
NEXT
PAGE CLICK HERE . . . .
BACK 1 PAGE CLICK HERE . . . . TOP OF PAGE
CLICK HERE . . . .
|